|
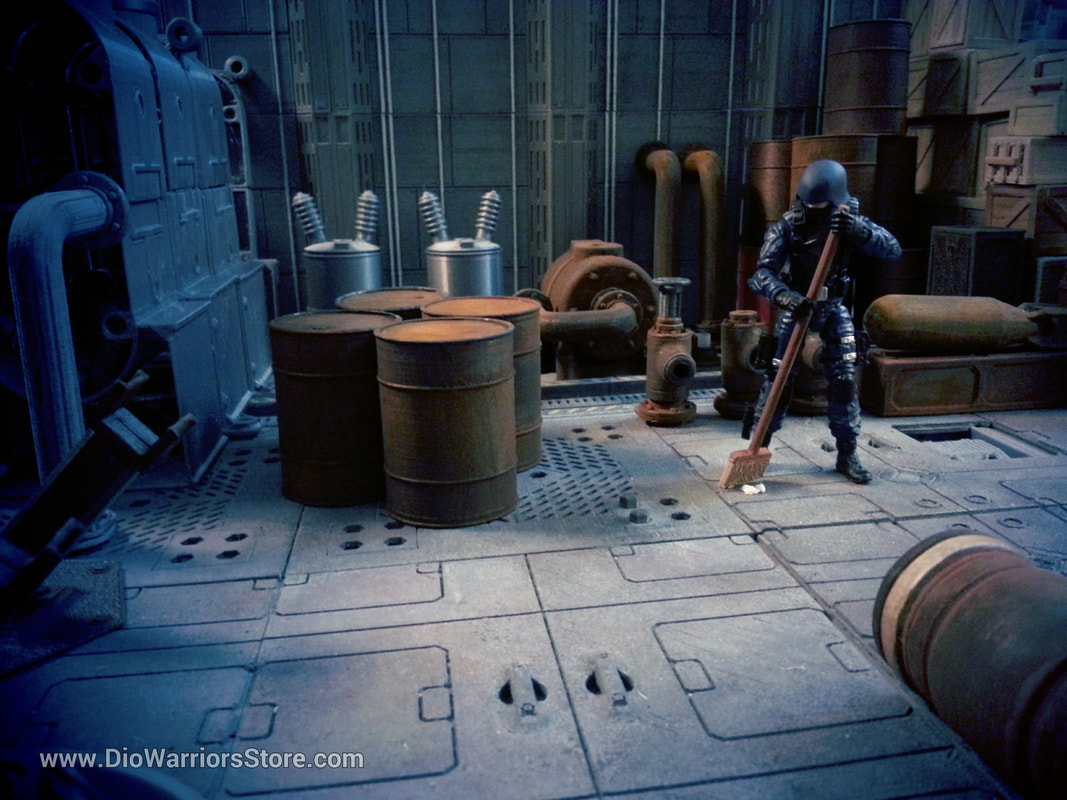
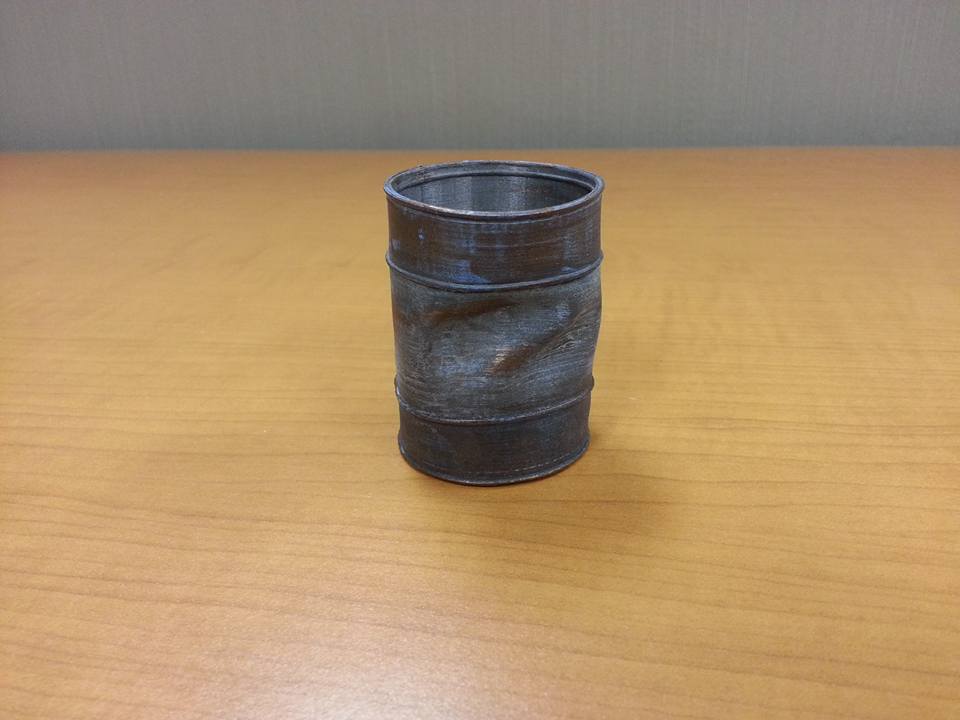
Barrels serve as significant background props, enhancing the passive aesthetic of a diorama. They also function well as space fillers. Besides old style "metal" drum barrels, DioWarriors had decided to do a series of modern plastic barrels -- something that would be appropriate for a modern laboratory or a sci-fi scene -- and make them available in various colors: blue, white, yellow, and orange. These barrels could be polished to a glossy finish for those customers who a require a pronounced plastic appearance. But why plastic barrels? Plastic barrels are utilized across various industries for storage, shipping, and other industrial purposes. DioWarriors' blue barrels serve as a versatile, all-purpose container, often seen in diorama backgrounds or being loaded onto trucks. These blue barrels can also be transformed into rain barrels for outdoor dioramas. The yellow barrels are appropriate for storing hazardous or chemical waste and can be labeled with decals indicating biological or radioactive hazards. Additionally, orange barrels are ideal for construction site dioramas or areas requiring traffic or pedestrian control, alerting a passersby to proceed with caution. DioWarriors also provides white-colored barrels for laboratory dioramas. The white color is commonly used for food-grade, chemical, or medical applications. In some of our own diorama photos, you can see a white barrel in the background usually. Like most DioWarriors items, these barrels are 3D printed and undergo post-processing to minimize the layer lines that are usually visible in 3D prints. After treatment, the barrels can be finished with a matte spray-paint clear coat to lessen the shine. The barrels come in 1:18 and 1:12 scale. Toy photography is a hobby that captivates me. It can range from being incredibly straightforward to highly intricate, based on the photographer's personal preferences. It can easily be as simple as a figure or two on a coffee table in a pose of fighting hand-to-hand, or with an elaborate diorama of a space station, or a throne room of a castle. There is no end to the possibilities to what can become toy photography. There are some essentials, though: a wide range of action figures is helpful, and a wide range of props. Props are an often overlooked hero of toy photography. A good prop adds interest and depth to a scene. Boss Fight Studio (BFS) has a fantasy line that includes knights and orcs. A merry gathering of orcs celebrating a raid against human settlements around a campfire could be highlighted with strong drink sloshing around in goblets. But there is a challenge, the fantasy segment of action figure collecting is quite specialized, and likewise there is a notable scarcity of suitable props. That's where DioWarriors enters into the spotlight. As an action figure collector who's also involved with toy photography, I find that I'm often having to design and make the props in my fantasy collection. Skull goblets are one of them. Concerning the Boss Fight Studio orcs, I always thought something more was needed for them. Something that was not a weapon that could be used with the orcs or found by knights. In other words, something neutral. The DioWarriors skull goblets are high-resolution 3D printed props made of resin, tailored specifically for BFS figures at 1:18 scale. It's essentially a goblet adorned with a skull. Simple to paint, robust, and intricately detailed, it's a "hero" prop highly detailed for close-up camera shots. Use them for celebration: a toast among orcs or humans -- a vessel to "drink the blood of thy enemies" -- or as an item in a treasure chest, or even a cursed magical item being held by a sorcerer. A skull goblet is a useful prop that can become the heart of a story and even the centerpiece of a photo. 
The DioWarriors barrel is a 3D printed prop designed to be customizable with a hairdryer. These barrels are simple to modify, accept paint readily, and are affordable. They are also straightforward to manufacture, featuring a removable lid and base. Dimensions are provided, enabling enthusiasts to create custom attachments and enhancements for incorporating the model into their distinctive diorama displays. A collection of DioWarriors barrels can serve as an intriguing backdrop or even as a prominent prop when placed close to the camera. How many decks? What exactly is this new VSS 002? Is it a carrier? Troop transport? Orbital space vessel? The original VSS was designed to be an ocean vessel, an aircraft carrier actually. However, when I got my VSS kit, I thought I'll do something different: make it into a space carrier. As a space carrier the thought was two-fold: I could use the ship to store a lot of the vehicles I have (20+ HISS tanks) instead of having them on display taking up shelf space. Secondly the VSS would grant me excellent photo opportunities to showcase the latest DioWarriors props as each room in the ship is essentially a diorama. So it was planned to make my VSS space carrier around four decks tall. One deck would be dedicated to hold all 20 HISS tanks and troops and any other vehicle that could fit, and the other decks to be used for both photo and aircraft/space craft storage. This was the original idea, and that idea is beginning to change. Deck Breakdown
The reality is that the VSS does take a lot of space--it is a huge ship. Size is the primary challenge. The aesthetics to make the kit look like a space carrier is actually easy, especially when borrowing a page from Star Wars by adding greebles everywhere. Greebles help a lot. However, to make the VSS practical to a collector then storage for troops and vehicles is a must. Always the challenge comes down to maximizing the space available.
As a collector much of my collection are in boxes, so I don't get to enjoy them or even see them. I can invest in yet more bookcases and that will enable me to see the collection. Bookcases are static, though. Something like the VSS is dynamic. A diorama engages the mind. And although a diorama in a shelf also engages the mind, a diorama on display in the middle of the room engages even more. So the VSS will have to be at the center of a room, not in a shelf, and the only way I can think of to maximize available space for it is to make the ship double wide. The ship would have to be stackable as well, but that can come in time. For the immediate concern Deck 2 would have to become twice as wide. A double wide Deck 2 would simply combine Deck 2 and Deck 3 of the original VSS 002 into one deck. The VSS is already wide -- an interior of two feet. Aesthetically the double wide look does seem to me a bit better balanced to the eye and doesn't look so boxy. Making the outer hull tapered with angled decks for a more streamlined look would also be easier with a double wide deck. And as already mentioned if another deck is ever needed, another double wide deck could be added. So going forward my VSS project will be three primary decks. The topmost deck is half the height, so the entire project is seeming to be 3.5 decks tall. The double wide look will present some challenges aesthetically, but I think I have some ideas how to deal with that. It'll still be a carrier. The next part of the VSS that will be extremely critical to get right -- as it will become a center point for photos -- is the engine room. In the previous version of the VSS this section was horizontal where the two large engine thrusters were side-to-side. In this version the thrusters are going to be vertical. The reason is partly for eye candy (me thinking this will give the new VSS a more space-ship appearance.) The second reason is the previous layout got very tight around the thrusters and ideally I wanted more spacing all around the engines. Having more spacing would help with photos and give a better impression how massive the VSS actually is. The tight areas were difficult for a figure to fit, so that limited photography in those areas. But this new vertical layout should alleviate that issue. In fact the issue now is there's a bit too much spacing that I now have to pad those areas. Not a problem, really. I'll just add more equipment. 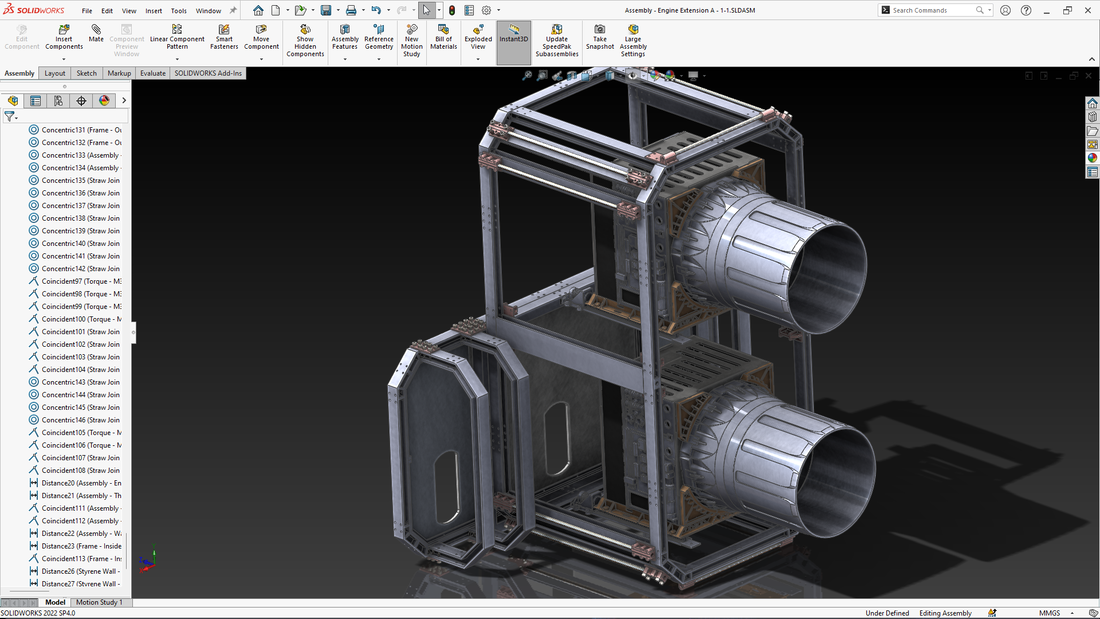 Attaching the engine room extension to the main body of the VSS is done with a small linkage. I don't currently have an idea how I'll design the front of this VSS, but I have a gut feeling this linkage is going to get used again. The front of this VSS might be another vertical piece. Would the front be some sort of main gun or some Star Trek inspired "Ten-Forward" observation lounge, I don't know. Both sound intriguing to do.  Building this VSS is somewhat like building a modern day skyscraper where the superstructure is built first, then floors and walls are added. This approach does offer a number of advantages for a diorama system over a traditional approach. These days companies that produce a diorama system take the view that the market is about toys, and although it is, those who are purchasing the diorama system are adults and adults do approach handing toys and things like models differently than a child does. The level of realism can be increased. The toy-ish approach to a diorama system is simply to supply tiles for a floor and wall. The thought is one side of the diorama will remain open for accessibility. At DioWarriors we experimented with many different approaches and it was decided that since our audience are adults, the method if "play" an adult does is mostly to display a figure in a pose and admire the overall diorama. Much like how a cell of a comic book is, where in each cell depict a different scene, an adult will typically pose a figure in a scene and leave it at that, When the adult returns, typically he or she alters the pose and objects, changing the scene and again leaves it at that. Admires the scene from a distance.
So, with this in mind, building the superstructure like a skyscraper will enable the VSS to be a 360 degree diorama. Meaning that in every angle, at every point of view, the figures posed within the VSS will be completed enclosed by the VSS. To access the figures and props various hatches will open enabling access. But this also means that when the hatches are closed there will be no way to see what's going on inside the VSS unless through a window or if there are cameras mounted/hidden inside the VSS itself. Certainly another challenge to overcome. |
DioWarriorsLatest News blog thingy. Archives
May 2024
Categories |


 RSS Feed